
ArtCraft is an open-source creative studio for working with AI images, video and 3D scenes. You can arrange a composition rather than relying on a prompt alone. It is an alternative for some Adobe creative tasks, especially AI image creation and scene planning. It does not replace every Photoshop, Illustrator or Premiere Pro feature. This guide starts with the browser app and a small practice project so you can understand the workflow before spending on generation.
Before you start: what is free?
The ArtCraft editor is free and open source. The project's source code is available under MIT or Apache-2.0. That software license is separate from the cost of running an AI model. Hosted generation can use paid credits or an optional subscription. Connecting another provider may require that provider's account, subscription or usage charges; using your own compute also has a cost. A free editor does not mean unlimited free AI images or video.
Open the official pricing page before generating. Check your balance, the selected model and any displayed cost for the job. Avoid buying a large package for your first experiment. Keep your original images in a folder on your device and use material you own or have permission to edit. Model terms and output permissions are separate from the editor's open-source license.
1. Open the app and choose the right workspace
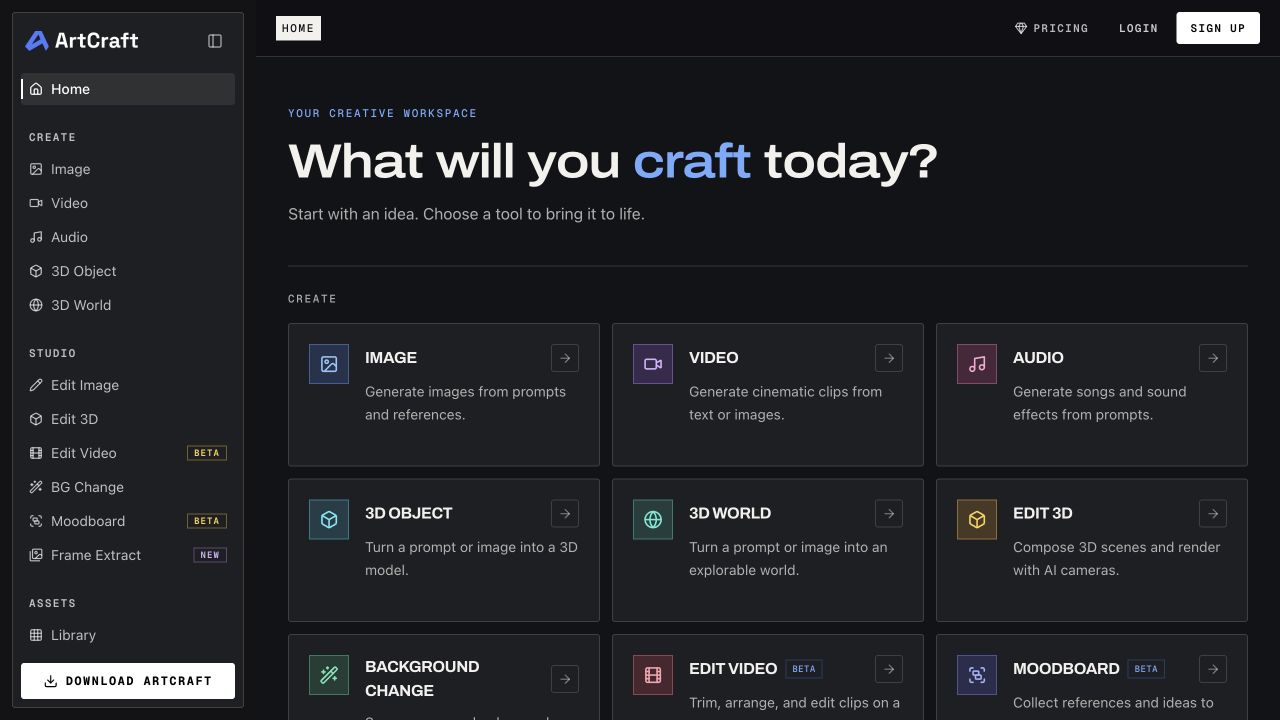
Open app.getartcraft.com. The home screen separates creation from editing. Image starts image creation; Video starts a clip; Audio handles sound. 3D Object and 3D World are different from Edit 3D, which is for arranging a scene. The sidebar also contains Edit Image, BG Change and a Library for assets. Pick one task rather than opening every workspace at once.
For a first project, choose Edit Image. You can open a blank canvas in the browser without first creating an account. A generation job or a saved cloud asset can require sign-in and available credits. Follow the app's own prompt if it asks you to sign in. You do not need an AltStack account to follow this guide. If you prefer a desktop app, check the official download page and current release availability.
2. Upload an image or create a blank canvas
In Edit Image, the starting panel lets you click to upload or drag in an image. Pick from Library uses an asset already in your account. Choose Blank Canvas if you are starting from scratch. This opens the canvas-size picker. For a simple square test, choose 1024 × 1024 and click Create Canvas. The available presets also include landscape and portrait sizes, so choose the shape that matches the final use.
A square canvas works well for a product concept or social post. A landscape canvas suits a video scene or website visual. Decide the shape before making lots of variations: changing it late can change the framing. If you upload a photograph, preserve an untouched copy. Check that the important subject remains visible and that the image is large enough for the output you need.
3. Describe the result and check the model settings
The editor includes a prompt field, a model selector, framing controls, a quantity control and Generate. Start with a short description that explains the subject, position, background and lighting. For example: ‘A ceramic coffee cup on a wooden desk, soft window light from the left, a plain warm background, cup centred with space above it.’ This is a practice prompt, not a promise that every model will produce the same image.
Check the selected model before running the job. The model available when we opened the editor was GPT Image 1.5; the catalog can change, so use the model that fits your current access and budget. Read the quantity control carefully. Our observed editor initially showed four outputs; reduce that where supported if you only want one test. Check the aspect ratio as well. Expand prompt is optional: read any expanded wording before accepting it so it still describes your idea.
4. Generate once, review, then make a specific change
When the prompt and settings are ready, check any cost confirmation and click Generate. If the app requests an account, a provider connection or credits, complete only the setup you intend to use. Generation and saving controls can vary by model and account. Follow the instructions displayed for the service you selected.
Review the result before starting another job. Check subject placement, edges, lettering, proportions and whether important details stayed intact. Keep a useful version before revising it. Change one thing at a time: ‘Keep the cup and camera angle; change the background to a light grey wall.’ A targeted instruction makes it easier to compare results. Avoid repeatedly clicking Generate while an existing job is pending; check its status and balance first.
5. Use the 2D canvas for more control
The 2D workflow can combine image layers, drawing and masked edits. Use it when you need to place objects or keep part of an image intact. Build a rough composition first: put the main subject in the correct place, arrange the background, and make the intended layout easy to see. A simple mock-up can communicate position more clearly than a long paragraph.
For a local change, choose the editing or masking control available in your current workspace and mark only the area you want to change. Ask for that change while naming what should remain. Test on a copy before applying it to your best version. Use the official 2D Editor Basics tutorial to identify the current toolbar icons and editing controls. Inspect the full-size result for seams or changes outside the intended area.
6. Turn a finished image into a short video
Once you have a still image you like, open Video and choose the image-to-video workflow supported by the selected model. Add your image as the starting reference. Choose the model, duration and framing from the options offered. Begin with the shortest useful clip instead of spending on a long sequence before you have tested the motion. Available controls and cost depend on the model.
Describe movement, not the whole image again. For the cup example, try ‘A slow camera move towards the cup; the cup stays still; the lighting remains unchanged.’ Generate a single test and review the beginning, middle and end. Look for unwanted object changes, sudden camera jumps and flickering details. Save the useful clip, then revise the motion or framing as a separate test. Edit Video is labelled beta in the observed app, so keep your original media and expect its features to change.
7. Arrange a 3D scene before generating an image
Choose Edit 3D when you want to control object placement, pose and camera angle. Start with a preset scene or import supported assets, then position the subject. Set the camera height, distance and framing before adding a style prompt. Treat this as planning a shot: decide what the viewer should see and what should stay outside the frame.
A 3D Object creation job produces an asset; Edit 3D arranges assets into a scene. Keep that distinction in mind. Add one object and one background first, check scale and camera placement, and only then build a more complex composition. Generate a preview using a model you can access, compare it with the scene layout, and change either the staging or the prompt deliberately. The official 3D Editor Basics and image-to-object tutorials cover the current controls.
8. Save, export and keep a reusable project record
Use the download or export control shown for the result you have selected. The exact control and available file formats can differ between an image, a video and a 3D asset. Do not assume that a preview image is the full-resolution export or that a flattened image preserves editable layers. Open the exported file on your own device and check its size, quality and format in the application where you will use it.
Keep the original input, final export, prompt, model name, canvas dimensions and any important settings together. If cloud Library saving is available for your account, use it as an additional copy rather than your only backup. For video, play the downloaded clip to check that it is complete. For further editing in another program, test the exact exchange format before moving a large project. This guide does not claim PSD, AI or Premiere project compatibility.
Which Adobe tasks can it replace?
Consider the main ArtCraft studio for AI image generation, prompt-based edits, composition experiments, background work and image-to-video ideas. These overlap with selected Photoshop and Firefly creative tasks. Try a small deliverable from your own workflow and compare the final export, editing control and total generation cost. It is not a feature-for-feature replacement for the entire Adobe Creative Cloud suite.
The same team also presents a separate Crafting Apps collection. Its official page identifies PhotoCraft and PdfCraft as early alpha, and lists applications such as VectorCraft and FilmCraft as in development. Those are separate projects, not proof that the main ArtCraft web studio already contains complete Illustrator, Lightroom, Acrobat or Premiere replacements. Check each application's release status and file support before using it for important work.
If something does not work
If Generate is unavailable, check that you entered a prompt, selected a model and completed any required sign-in or provider connection. If a job fails, inspect its status and credit history before submitting it again. For an unexpected charge or missing result, use ArtCraft's official support page with the job details; do not publish account credentials.
If an output is wrong, simplify the scene and change one setting. For a poor video, shorten the clip and request less motion. If an upload or export is unavailable, check the supported formats in the current interface and official tutorials. Keep your local originals while troubleshooting. Finish one small image project successfully, then add video or 3D when you know which extra capability you need.
Official instructions and sources
Open the ArtCraft web studioArtCraft pricing and optional creditsArtCraft source code and licensesOfficial 2D Editor Basics tutorialOfficial 3D Editor Basics tutorialArtCraft image-to-video workflowArtCraft 2D canvas workflowArtCraft text-to-image workflowCrafting Apps and release statusArtCraft official downloadsArtCraft supportOriginal AltStack guide by Sushil Kumar Sah. Installation steps follow provider documentation; they do not imply testing on every supported device.